• Summer collaboration

    I hope you have had a lovely summer with many and great sewing projects. and I have some exciting news for you! I’ve teamed up with Flora L for a great collaboration and we have an offer for you! Their linen fabrics and my Hummingbird patterns are a perfect combo and until Sunday the 14th august you will get a 25% discount on both! Use the code HUMMINGBIRD2021 to get the discount on their linen fabrics by meter in their web shop and for the Hummingbird PDF patterns in my Etsy shop.

    Photo: Malena Björndahl

    I sewed the short sleeve tunic in the Cypress spores blue green fabric and the shorts in Poppy seed fabric for Nova and I really enjoyed the sew! The fabric is so easy to work with and you can tell that it’s such a good quality fabric! It’s 185 gsm, so it’s the prefect weight for tunics, blouses or loose fitted trousers. Judith from @flora.l.design used two different fabrics for her short sleeve tunic, such a nice detail! And the scrunchie that she made is the best scrap-busting-project!

    Photo: Malena Björndahl

    The Hummingbird tunic and trousers PDF patterns are a collaboration with @malenami . She has such a good eye for design, clothes and photography. Judith and I joined her on the beach and she took these amazing pictures!

    Photo: Malena Björndahl

    Thank you both, Judith and Malena, it was amazing working with you both

    This offer is valid until 14th of August.

    Photo: Malena Björndahl
  • eXpression Fashion Show

    The 25th September eXpression Umeå and Ume Projects arranged a fashion show. I’m so happy I could participate in it with my grments! I made a small spleepwear collection with Hummingbird tunic and trousers and Fieldfare joggers. Here are som pictures from the show, all taken by Malin Grönborg.

    Hummingbird tunic with short sleeve and Hummingbird trousers (long version)
    Hummingbird tunic with long sleeves sewn in jogging fabric and Hummingbird trousers as shorts. And behind the mama is a shy Hummingbird tunik with 3/4 sleeves and a Fieldfare joggers.
    So many fantastic and creative people participated in the show.
    Backstage
    Backstage

    It was also great to see some of my clients in the show!

    Design by Bjork
    Design by Bjork
    Make by Sweden
    Sigr
    Sigr
    Sigr
    Sigr and Hummingbird tunic together
    Many thanks to Oskar from eXpression and Lisa from Ume Project

    Unfortunately I cound not be there myself, but I’m so happy that I could still join and see it on their live stream and that they had such a good photographer there.

    You can find all my PDF patterns at my Etsy shop!

  • My first CoLab

    I’ve mentioned several times that I’ll tell you more about my collaboration with Malena “Malenami” Björndahl. It has been so great working with her and I want to share how it started.

    As a business owner you need to have many roles, you have to be an administrator, salesman, marketer, do the “actual job” ie pattern construction, do all the small things (buy new ink or paper, run errands and just fix stuff) and quite a few other things as well. I delegated some tasks right away, like the accounting. Other things I’ve had to do myself, due to financial limitations, even if it has not been my “strong side”… Marketing and managing social media is one example. After listening to a lecture by Zanna Metzer from Sisters in Law arranged by eXpression about these topics, I realized that I needed help! My Instagram feed was all over the place and it didn’t have the “right visual look” that I wanted. I already knew this, but after the lecture I decided that something had to happen. I talked to my business coach at eXpression and discussed how I could change and improve my work and as so often we came to the conclusion that if it’s something you cannot do yourself, you need help from others. Either you delegate it, or you get help from someone who can teach you. We have a saying in Sweden: “Alone is not strong”.

    I’d for a long time followed the blogger and influencer Malenami and really liked her way of taking pictures and writing. It felt so genuine, warm and welcoming. She also comes from Ostrobothnia in Finland where I grew up and had quite recently moved to Umeå, just like me. I wanted to work with her! In addition, we are both named Malena, I mean, what are the odds of that? (So ​​to make it less confusing, I’ll write Malenami about her …)

    Malena Björndahl and me

    I contacted her and asked if she was interested in coaching me in social media and also taking product pictures for me. We started by talking about me and my brand “Pattern by Malena”, what it is I want to convey, my “niche”, my visual design language and how I want to communicate with my customers and followers. I got a lot of great advice and ideas for how to work. And if you scroll in my Instagram feed you can see an “before” and “after”, at least for me it’s very clear …

    One thing I struggled with earlier was the lack of good pictures to post. I wasn’t done with my patterns yet and couldn’t then take good product pictures. But now that I started getting to that stage and Malenami took such beautiful pictures of herself and her children in my clothes, well then it became a lot easier too. During the winter I also went to a photo course to make it easier to use my camera. I’ve had that camera for maybe 10 years, but it’s mostly the different auto settings I used. Now it became easier for me to take better pictures, both for social media but also for the sewing tutorials.

    Malenami and her son in Hazelhen Tee and Fieldfare joggers

    During the time that Malenami coached me, we also talked a lot about clothes and design. She mentioned that she and her family were going to Thailand during the winter (before the pandemic happened) and what kind of garments she wished she had for herself and the children. One thing led to another and we decided to do a collaboration, a CoLab. She got to do what she’s good at, design the clothes and photograph them and I got to do what I’m good at, design patterns and sew the garments. I’ve always worked in teams before and getting to collaborate with someone again was so great!

     Hummingbird tunic and trousers for children are the first garments in our collection. We had (and still have) plans for a larger summer collection for linen garments for both women, children and babies, but I didn’t have enough time during this spring to complete all patterns unfortunately. But it will be a next summer too, so stay tuned!

    Hummingbird tunic and shorts

    All pictures taken by Malenami

  • Pattern launch: Hummingbird Tunic and Hummingbird Trousers for kids

    Today two new PDF-patterns are launched, Hummingbird Tunic and Hummingbird Trousers. I am so happy with them for several reasons! These are my first patterns for woven fabrics and sewing in linen has been a dream! I love knitwear, but there is something special about a beautiful linen fabric! And this is the first time I have made a pattern in collaboration with someone, the talented Malena “Malenami” Björndahl. You can find her here on Instagram and her blog here!

    We have worked together over the past year on several things. She started as a social media coach for me (thanks to eXpression that made it possible), then I hired her as a photographer to take product pictures for the Fieldfare joggers and the Hazelhen Tee and now we have done these patterns together! She has designed the garments and taken amazing pictures during her family trip to Thailand last winter. But, I’ll tell you more about our collaboration later, it deserves its own post!

    You can find these two patterns (sold separately) at my Etsy shop and during this weekend you can buy them for 20% off, no code needed. The patterns and tutorials are written in Swedish.

    Size and fit:
    Both the tunic and the trousers are for children and are made in sizes 92-140. The silhouette for both of them are loose and comfy, perfect as airy and easy summer garments.

    Short sleeve

    Design options:
    These patterns have several design options on the sleeve and leg length. For the tunic there are three options; long sleeve length, 3/4 sleeve length and short sleeve length with fold-up as finish. The trousers have two options for the leg length. One option is full length and has a leg strap that allows you to easily fold the leg up to a 3/4 length. The second option is shorts length and has a sewn on fold-up at the bottom.

    Full length leg
    The strap makes it easier to keep the full length leg folded.
    An easy pattern-hack is to use a striped fabric and change the direction of the waist and leg fold-up.

    Material recommendations:
    For these designs I recommend thin to medium thick woven fabrics in cotton, viscose and linen.

    PDF pattern
    This pattern is created so that each size is in a separate layer and different colors. Both A4 / Letter and A1 are available as two PDF files. One PDF contains only seam allowance lines and the other contains both sewing lines and seam allowance lines. You can therfore turn on and off the different layers and choose to print only one size or several sizes and if you want to see both the sewing line and the seam allowance lines. The seam allowance is 1cm and the hem is 3cm.

    Sewing tutorial:
    A detailed sewing tutorial is included where I show each step with both images and text. As mentioned, it is only in Swedish at the moment.

    Now we keep our fingers crossed for a lovely summer with a nice amount of sun, rain and many lazy days in comfy linen clothes!

  • Sewing tips for a t-shirt

    Today I want to share a lot of links with you! I have previously linked to Johanna Lundström’s blog The Last Stitch where she wrote about sewing a drawstring in knitted fabric and I now want to share more of her valuable sewing tips!

    Sewing a t-shirt in knit fabric can be done in several ways and there are many choices depending on which machine or machines you have or how you want the design to look. In my sewing description for Hazelhen Tee I give eg. one suggestion on how to sew the neckline and how to strengthen the shoulder seams, but you can do it in more ways! That’s why I want to share some (okay, found quite many) good tips that Johanna has written about!

    A small addition to this tips! Covering the overlock seam with a band gives a nice result, but it also affects how much the neckline can be stretched, especially if you use a woven tape that has no stretch. I have chosen to make the neckline on my t-shirts quite small, so if you use a woven tape at the neck you will need to increase the size of the neckline in order to comfortably pull the t-shirt over your head, especially for the children’s t-shirt! In an upcoming post, I’ll show how you can easily adjust the neckline to the size you like!

    If you like watching vidoes, I recommend her youtube channel! There are lots of great tips and other interesting videos there!

    And if you want read more of her, I can recommend her books! I got the book “Sewing activewear” which I showed and used during a sewing course I arranged. And if you want to learn how to sew on a coverlock, she’s written the book “Master the Coverstitch machine” which I should read. I have a coverlock and at the moment I only sew “ordinary” hems with it, but it has so much more potential! So some day in the future I’ll start the cover-project!

    And just to be clear and transparant, this post is my tips (I mean, my tips on where to find her tips …), so it’s not a sponsored post. I rather focus on writing posts about fit adjustments and pattern hacks and therefore I share sewing tips she’s already written. We have different strengths and those are the ones we should focus on! We have been in contact for some time now and helped each other on several occasions. For example, I have helped her with the grading on her PDF pattern Aila leggings and she has recently helped me finilize and “do a better structure” of the sewing description for my pattern Hazelhen Tee. I just love when small businesses can support each other!!

  • Pattern hack – shorts

    Finally it is summer and time to wear shorts! If you have a trousers pattern you like, you can easily make them into shorts, but there are a few things to keep in mind!

    I’ve made shorts for my baby using my pattern Fieldfare babies’ joggers and want to show the different steps here. The same principle applies to trousers for women, children and men.

    I wanted a fold-up at the bottom edge so the wrong side is visible. To get a nice finish, I folded it in 0.5cm at the top and sewed it by hand.

    How to make trousers into shorts:

    1. Decide the length of the shorts

    Either you measure yourself (or your child) and see how long the leg inseam you want or you can measure a pair of shorts you already have and like.

    I drew the new leg bottom about half of the inseam of the current trousers. This trousers pattern has a wide leg cuff that also affects the leg length, so the shorts will be about 1/3 of the “total leg length”. I want the shorts to end just above the knee.

    2. To get a smooth bottom edge

    When you draw the new bottom line, you want a soft and smooth transition at the side seams, both on the inner and outer side seam. You can place the pattern pieces together and draw a smooth and softly curved line.

    3. Draw the fold up and seam allowance

    I wanted a 2cm fold up and a discreet edge at the top, so I added a 0.5cm as a “folded in hem”.

    In order for the fold-up not to be too small in the sides and start pulling at the top, the fold-up needs to have same width as the trousers. Therefore, I have drawn a thinner line where the fold-up should end and then “mirrored down” that line and then get the lines for the fold-up.

    Since I used a stretchy jogging fabric, I can “force” the fabric to be folded into a slightly rounded shape with the help of pressing/ironing with steam.

    If you have trouble figuring out exactly what the angles of the fold-up and the small “fold-in” should be, you can try folding a paper and cut along the edge and then unfold and see how the angles.

    4. Sew the trousers

    After the trousers are cut you sew them with the same steps as the regular trousers. When sewing the bottom edge of the shorts, you fold and press/iron the small fold-in part and then the fold-up and either sew down the edge with a sewing machine or as I did, sew the edge by hand.

    Of course, you can also make other endings on the leg as well. You can have a regular hem, sew on a separate fold-up or some other solution.

    Good luck!

  • Pattern launch: Hazelhen Kids’ Tee

    Hurray, the Hazelhen Kids’ Tee is now ready and launched! It’s made in sizes 92-140 (2-10 years) and for now it’s available in Swedish (the English translation will be available later this summer or early fall).

    You can find it at my Etsy shop and it’s 20% off this week (until Sunday midnight, Swedish time, no code needed).

    Size and fit:
    The PDF pattern is in sizes 92-140 (2-10 years) and it’s a classic t-shirt style, easy to sew and you can use it as a base to do your own pattern adjustments and hacks on! The fit is comfortable and easy to move around and play in. The width measurments have plus ease compared to the body measurement (approx 6-7% bigger)

    Sewing tutorial:
    A detailed sewing tutorial is included where I show each step with both images and text. It is suitable to a beginner, but the description also contains tips that an experienced seamstress can benefit from. And as mentioned, it is only in Swedish at the moment.

    Material Recommendation:
    The fabric recommendation is a jersey or knit that stretches as least 40%. The sewing description and pattern includes a stretch guide so you can easily check your fabric. But the fabric should also stretch about the same on the length, ie at least 40%. If the fabric is stiffer in width or length, the fit may feel too tight.

    PDF pattern
    This pattern is created so that each size is in a separate layer and different colors. Both A4 / Letter and A1 are available as two PDF files. One PDF contains only seam allowance lines and the other contains both sewing lines and seam allowance lines. You can therfore turn on and off the different layers and choose to print only one size or several sizes and if you want to see both the sewing line and the seam allowance lines. The seam allowance is 1cm and the hem is 2cm.

    Stay tuned here on the blog and I will show you some pattern hacks and fit adjustments you can easily make to adapt the pattern!

    All photos are taken by MalenaMi.

  • Pattern launch: Hazelhen Tee

    Finally it’s time to launch my second pattern, Hazelhen Tee! It is made in women’s sizes EUR 32-56. There will also be kids’ sizes available soon and later in the fall baby sizes will also be launched! The pattern and instructions are only in Swedish at the moment, but later this summer an English version will be released as well!

    This has been such a fun and interesting pattern to work with as it is designed for two different cup sizes. There is a version for B-cup that is without bust dart and a variant for D-cup that has a bust dart. A bust dart can really do so much for the fit if you have a fuller bust. I have increased the width and the length of the front piece and the bust darts reduces the drag lines under the armhole.

    You can now find this pattern here at my Etsy shop and during the weekend, until Sunday midnight (Swedish time), I offer a 20% discount as a launch offer! No code is needed.

    Size and fit:
    The pattern is available in sizes EUR 32-56 in both cup versions. The T-shirt has a slim fit and the garment measurement over the bust is about 5% smaller than the body size. It is a classic and simple design and perfect to wear as a base garment or to have as a base pattern when making your own pattern adjustments.

    Sewing tutorial:
    A detailed sewing tutorial is included where I show each step with both images and text. It is suitable to a beginner, but the description also contains tips that an experienced seamstress can benefit from. And as mentioned, it is only in Swedish at the moment.

    Material Recommendation:
    Since the garment has a minus ease over the bust and hip, a stretchy knit is required, it should have at least 40% stretch in width. The sewing description and pattern includes a stretch guide so you can easily check your fabric. But the fabric should also stretch about the same on the length, ie at least 40%. If the fabric is stiffer in width or length, the fit may feel too tight. The striped fabric, in which I sewed a photo sample, had only 25-30% stretch, but I then made it one size bigger to compensate for the stiff fabric.

    PDF pattern
    This pattern is created so that each size is in a separate layer and different colors. Both A4 / Letter and A0 are available as two PDF files. One PDF contains only seam allowance lines and the other contains both sewing lines and seam allowance lines. You can therfore turn on and off the different layers and choose to print only one size or several sizes and if you want to see both the sewing line and the seam allowance lines. The seam allowance is 1cm and the hem is 2cm.

    This is what the A0 PDF looks like when only size 44’s sewing lines and seam allowance lines are visible.

    Stay tuned here on the blog and I will show you some pattern hacks and fit adjustments you can easily make to adapt the pattern to your body!

    All photos are taken by MalenaMi.

  • Fitting issues at the crotch – trousers

    I’m trying a new way to illustrate fitting problems! I’m still a beginner in this program, so I hope you can bear with me that some of the pictures are not so clear… Some of the pattern images are also quite exaggerated to make the problem appear on the 3D image, but I hope you understand what I wanted to show!

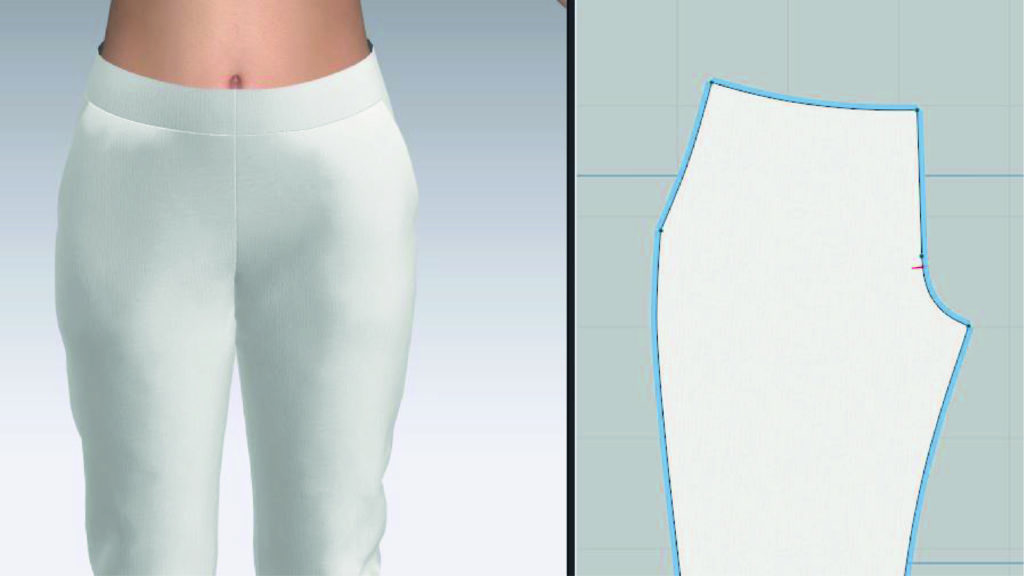
    Fieldfare joggers crotch – front

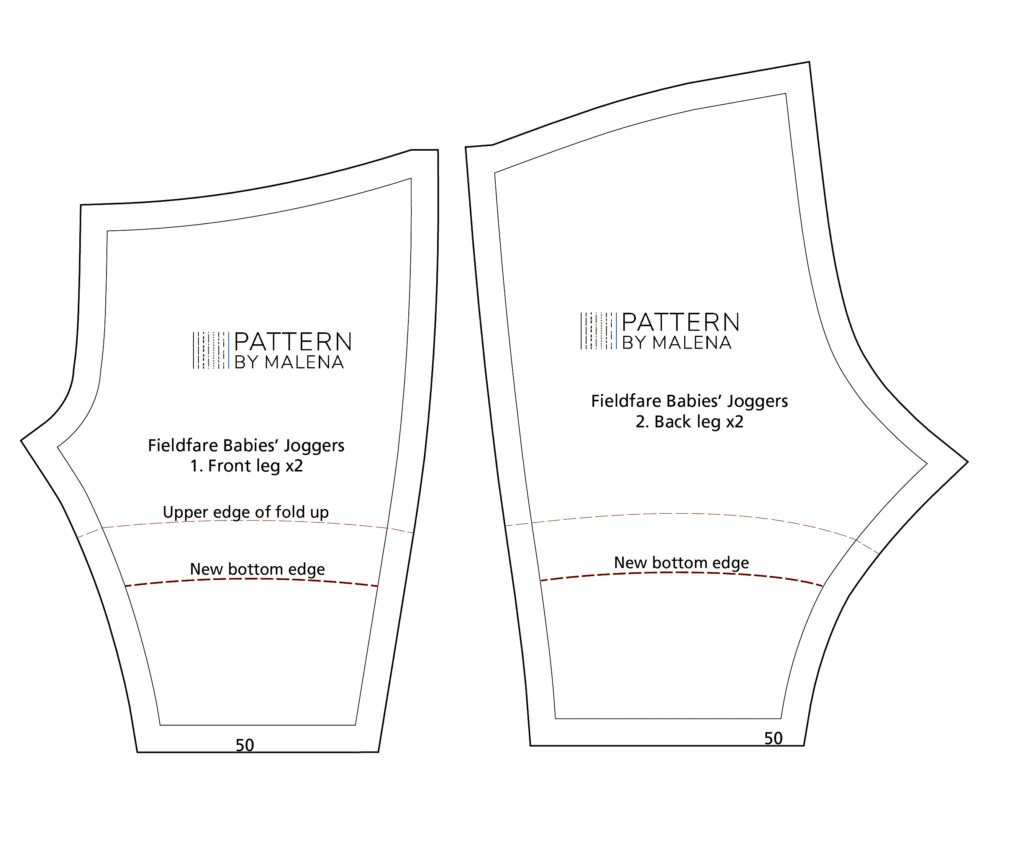
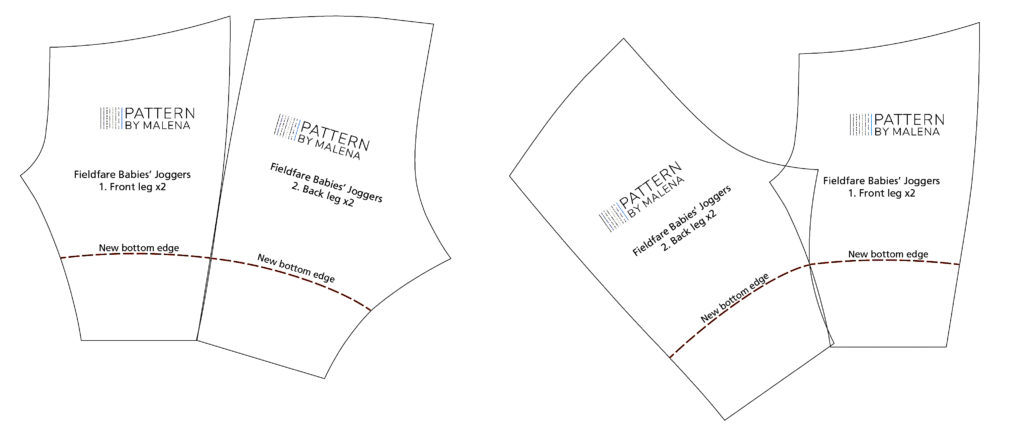
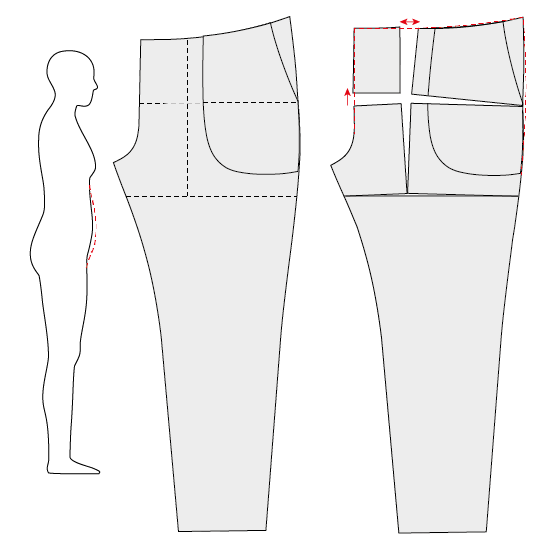
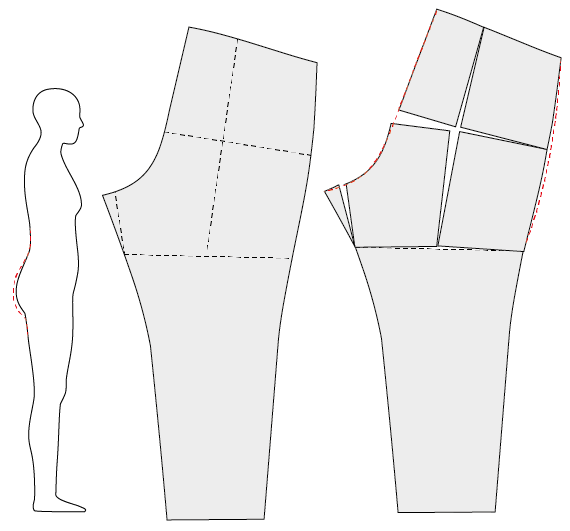
    This is how the regular crotch looks on my Fieldfare joggers. I’ve used this as a starting point and then adjusted the pattern in a “bad” way. The avatar body is the same in all pictures (you can change the body in the program as well, but I need to learn more how to do that….). The red dashed line on upcoming pictures shows how the original pattern looks like.

    Too short crotch – front

    The tip of the crotch is too short and the fabric is pulling downwards towards the crotch. The front rise is too close to the body, it needs more width in the front.

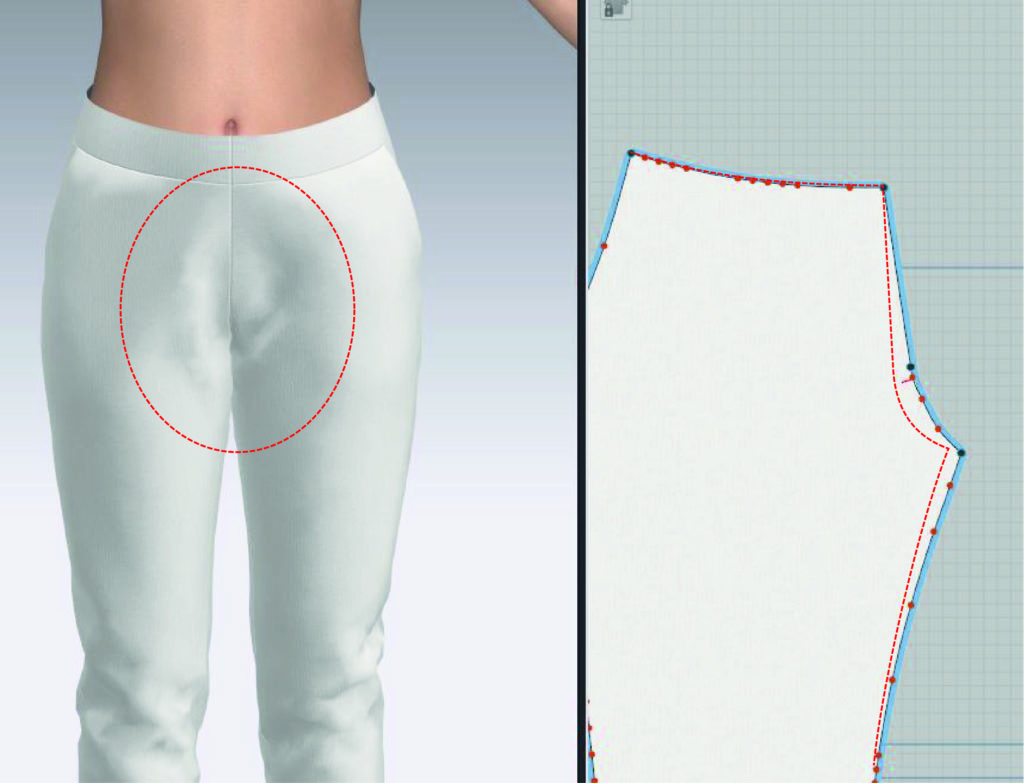
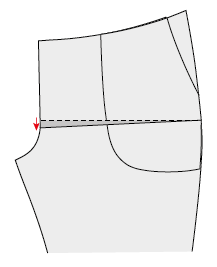
    Too much fabric in the crtoch – front

    Loose vertical creases appears at the lower part of the crotch. The issue is that the angle of the front rise is too sloping and the crotch point is too far out, there is too much fabric in the front. The easiest way to see how much you should remove is to first pin away the fabric when you fit the trousers and then on the inside sew by hand the new crotch line and fit the trousers again to see if the adjsutment was good.

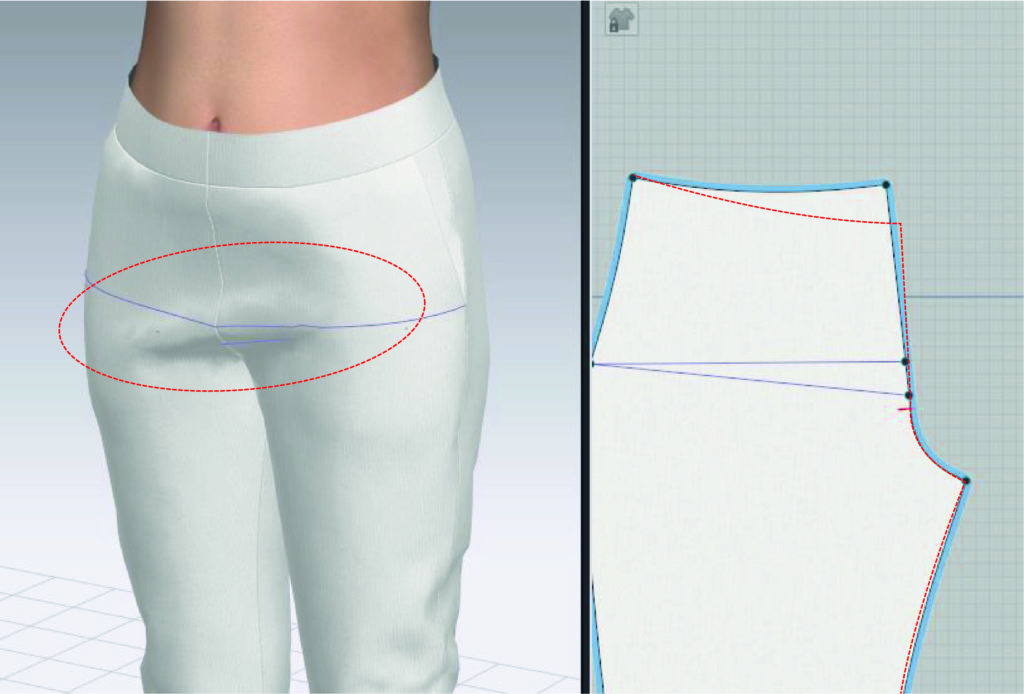
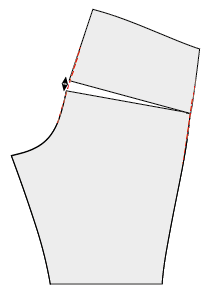
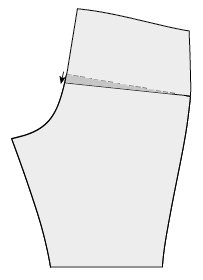
    Crotch length is too long – front

    There is extra fabric at the crotch. You can see in the picture of the pattern that I added a “wedge”. This causes the front rise to become too long and the upper half of the front rise to be too angled . When you fit trousers it feels like you want to “pinch away” a pleat in the crotch or “lift up” the waist for the crotch to fit better. I also showed this adjustment in a previous post that was about increasing / decreasing width at the tummy and seat.

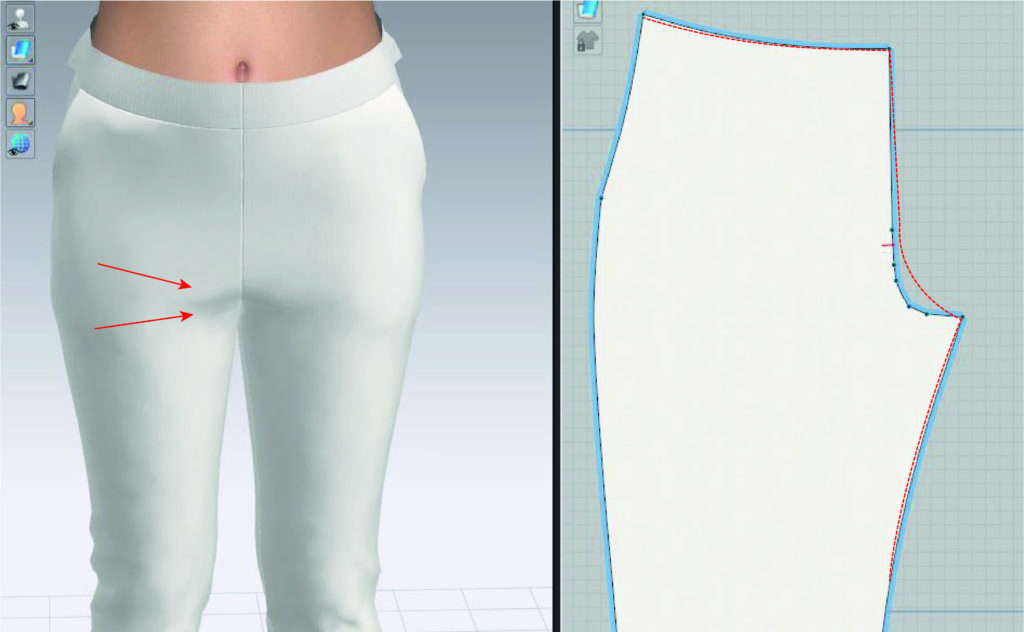
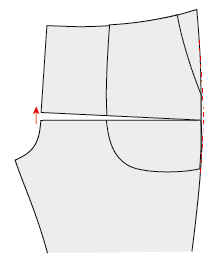
    The crotch curve is cutted too deep – front

    In the 3D picture, this fit issue may look a bit similar as to the previous picture. The difference is that on the previous one, the fabric created an “extra pleat” that you wanted to pinch away. In this case, the fabric is pulling from the thigh towards the crotch (like whiskers) which means there too little fabric (it’s too tight). The crotch curve is too deeply cutted and therefore the fabric is pulling towards the crotch.

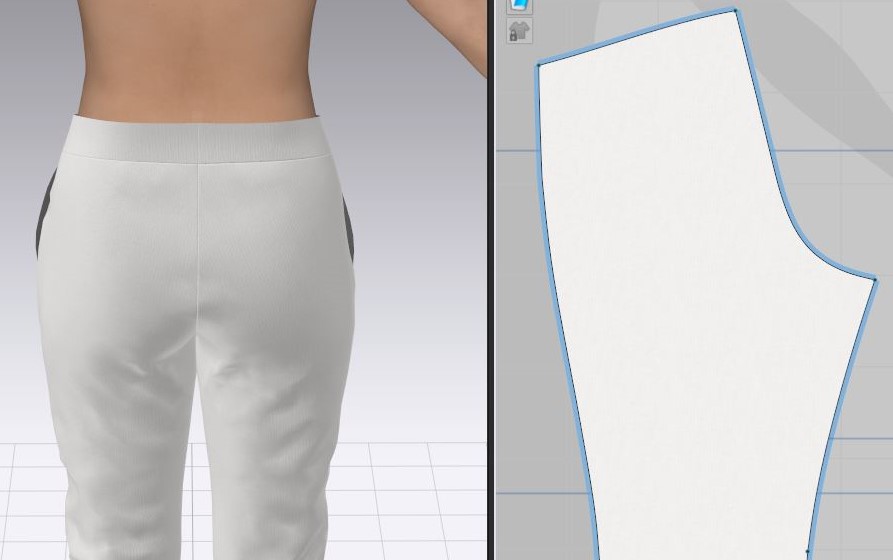
    Fieldfare joggers crotch – back

    Here is the original shape of the back pattern piece of the Fieldfare joggers.

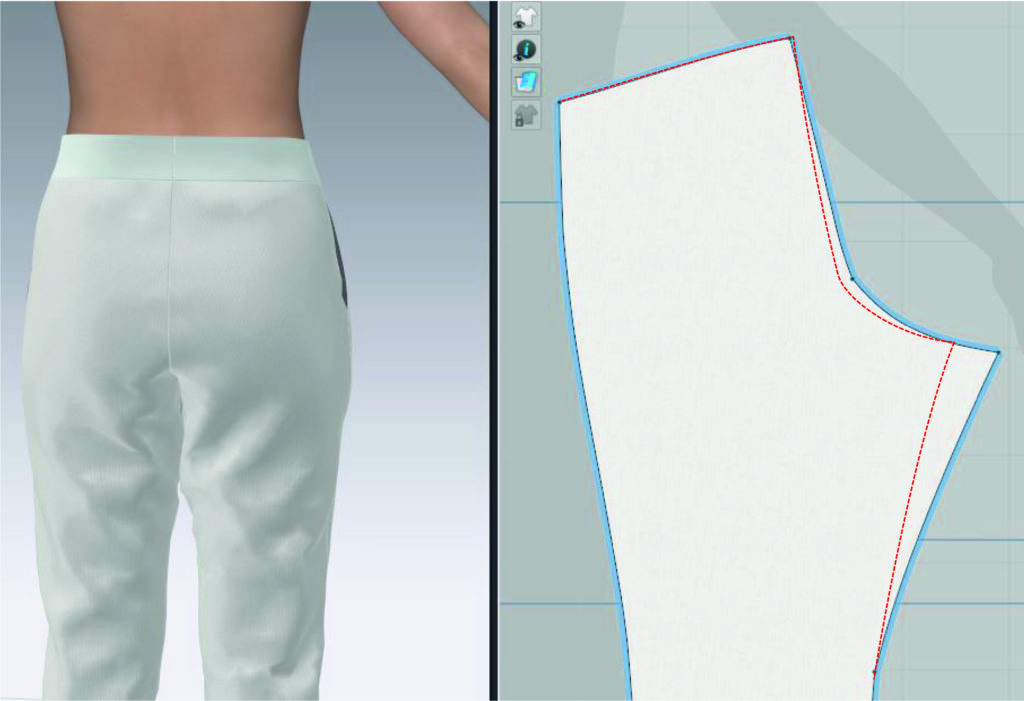
    Too long crotch point – back

    The crotch point is too long. The width at the seat looks pretty good, but there is too much fabric under the seat and it creates creases at the crotch.

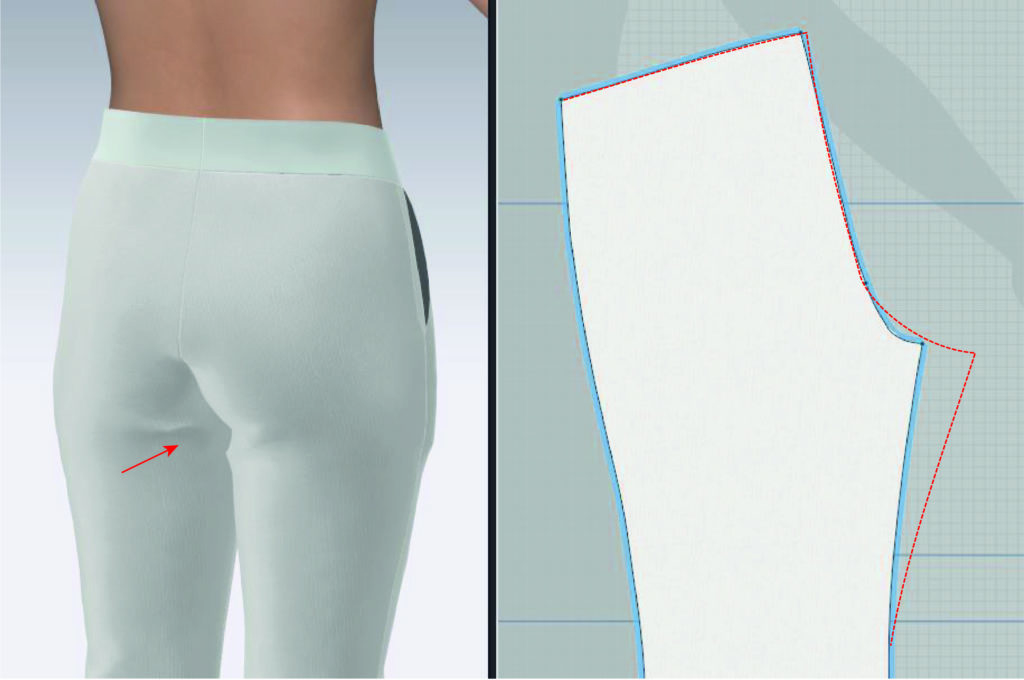
    Too short cortch – back

    In this picture, the crotch length is too short and therefore fabric starts to pull up towards the crotch. It’s not so clear on the 3D image, but the fabric is pulling from the thigh and up towards the crotch point.

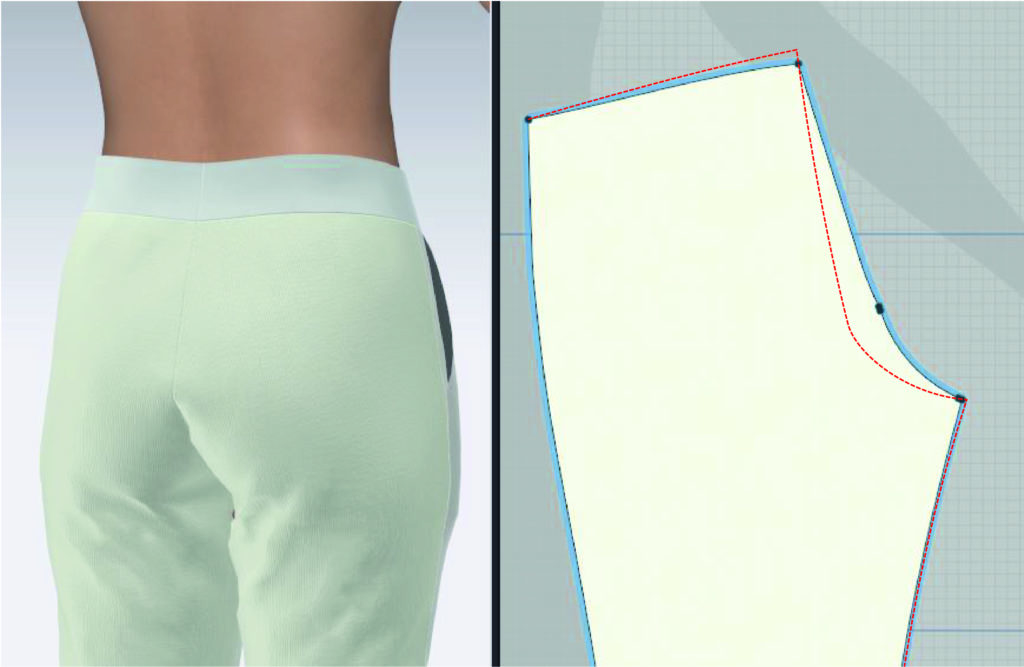
    Too short and straight crotch – back

    In “The Great British Sewing Bee”, they talked in an episode about “the hungry bum”. I think that is a very good description for this problem, the fabric wants to move up and “eat” the bum. The back rise is too short, both at the top and the shape is also too straight, ie it is not enough “rounded” or scooped out at the bottom. If you notice this during the fitting, you can easily sew a new back rise shape by hand that is more curved, and then try them on again. You can also see that the waist in the middle back is not really straight, a small V-shape is formed at the back rise seam. If you see this (may also be in the front) you can move up the waistline a little and also check that the angle is 90 degrees.

    The last two pictures are both showing a too short back rise where the fabric “wedges in”. How do you then know which change to make? It doesn’t show very clearly in the picture where the crotch point is too short, but then the fabric is pulling up towards the crotch and it is tight under the seat. In the last picture, vertical folds are formed (or perhaps more sloping from the side of the seat towards the inner thighs), ie the creases have a different direction. There is too much fabric in the lower crotch that you want to “scoop out”.

    Good luck with your fitting adjustments!

  • Increase or decrease width on a pattern, part 2 – trousers

    In this post, I will show adjustments you can make to increase / decrease the volume over the tummy and seat.

    Full tummy adjustment:

    If the waistline is too low at front or if you have a slightly bigger tummy, you can cut the pattern at the hip line (-ish) and increase 1-2cm at the front rise. This gives a longer length of the rise at front. Remember to adjust your pockets as well.

    If you want to make a bigger adjustment, it is good to increase both the length of the front rise and also the width of the waist at front. Cut the pattern according to the picture below and increase both the width and the length. Just make sure you don’t make the front rise angle too much slanting in the worng direction, it should be straight (vertical) or slightly angled to the right.

    Decrease the volume at the tummy:

    If you get extra fabric at the front crotch that you want to “pinch away”, you can shorten the length of the front rise. You then cut the pattern at the hip line and remove the width at the front. I recommend sewing a test garment so you can “pin” how much fabric you want to remove.

    Full seat adjustment:

    If you want to increase only a few cm at the seat, you can cut and add volume at the back rise (around the hip line).

    If you want to increase more, both on the back rise length but also on the width, it is good to cut and increase the width according to the picture below. In this case, I wanted to keep the waist measurements, so no width is added to the waist. Depending on how much you want to increase the width, you can also cut and increase slightly at the back crotch point, but it may not be necessary in all cases.

    Decrease the volume at the seat:

    If you only want to reamove a bit of volume at the seat, you can shorten the back rise length across the hip line.

    If you have a lot of extra fabric on your back thighs that you want to remove, you can cut and decrease the width and length accoring to below picture. And again, it’s always good to make a test sample and see how much fabric you need to pin away.

    Keep an extra eye on the angle of the back rise slant. For a fuller seat, the back rise will be more slanting (more angled), while a flat seat has a straighter back rise slant. Different patterns can have different angles from the beginning, so it may vary how much you need to adjust your pattern. The material can also affect this, a pattern made for a woven or a knitted fabric will not have the same slant. My tip is to get into the habit of checking how the back rise (and front rise as well) looks and what “your angle” needs to be. If I’d give advice on a pattern adjustment for a customer, I need to both see the garment on the customer, but I also see what the pattern looks like. Over time, you will get “an eye” for this and it will be easier to see what needs to be done on a pattern.

    Good luck and just let me know if you want me to clarify something!