In this post, I will show adjustments you can make to increase / decrease the volume over the tummy and seat.
Full tummy adjustment:
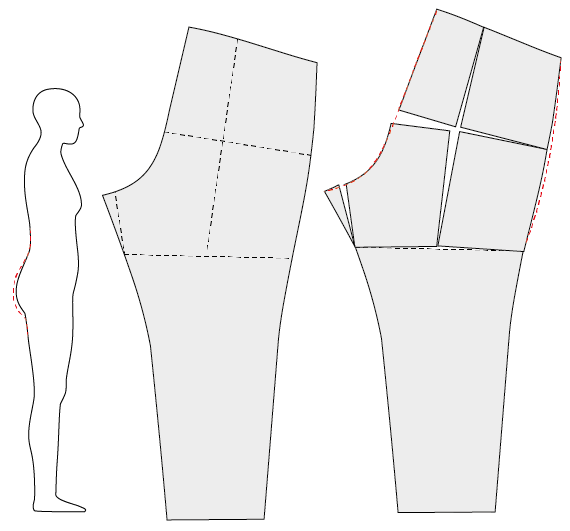
If the waistline is too low at front or if you have a slightly bigger tummy, you can cut the pattern at the hip line (-ish) and increase 1-2cm at the front rise. This gives a longer length of the rise at front. Remember to adjust your pockets as well.
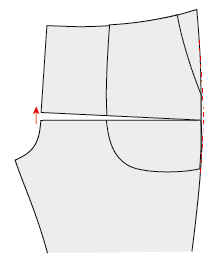
If you want to make a bigger adjustment, it is good to increase both the length of the front rise and also the width of the waist at front. Cut the pattern according to the picture below and increase both the width and the length. Just make sure you don’t make the front rise angle too much slanting in the worng direction, it should be straight (vertical) or slightly angled to the right.
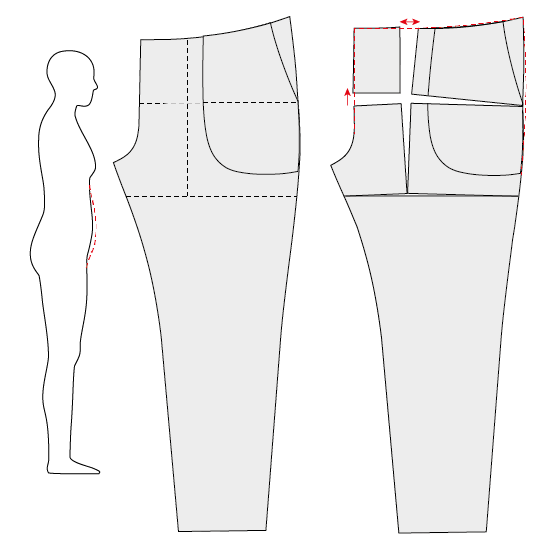
Decrease the volume at the tummy:
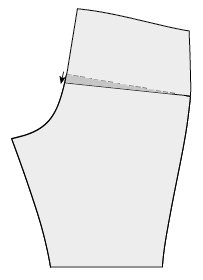
If you get extra fabric at the front crotch that you want to “pinch away”, you can shorten the length of the front rise. You then cut the pattern at the hip line and remove the width at the front. I recommend sewing a test garment so you can “pin” how much fabric you want to remove.
Full seat adjustment:
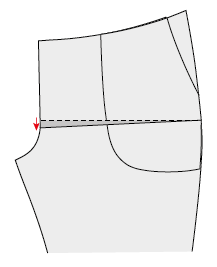
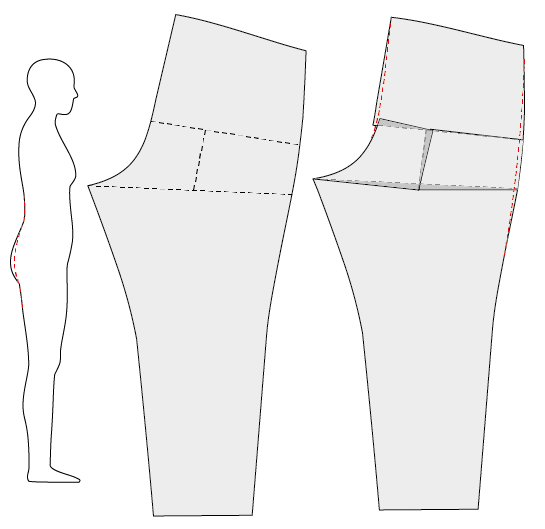
If you want to increase only a few cm at the seat, you can cut and add volume at the back rise (around the hip line).
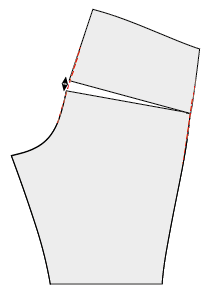
If you want to increase more, both on the back rise length but also on the width, it is good to cut and increase the width according to the picture below. In this case, I wanted to keep the waist measurements, so no width is added to the waist. Depending on how much you want to increase the width, you can also cut and increase slightly at the back crotch point, but it may not be necessary in all cases.
Decrease the volume at the seat:
If you only want to reamove a bit of volume at the seat, you can shorten the back rise length across the hip line.
If you have a lot of extra fabric on your back thighs that you want to remove, you can cut and decrease the width and length accoring to below picture. And again, it’s always good to make a test sample and see how much fabric you need to pin away.
Keep an extra eye on the angle of the back rise slant. For a fuller seat, the back rise will be more slanting (more angled), while a flat seat has a straighter back rise slant. Different patterns can have different angles from the beginning, so it may vary how much you need to adjust your pattern. The material can also affect this, a pattern made for a woven or a knitted fabric will not have the same slant. My tip is to get into the habit of checking how the back rise (and front rise as well) looks and what “your angle” needs to be. If I’d give advice on a pattern adjustment for a customer, I need to both see the garment on the customer, but I also see what the pattern looks like. Over time, you will get “an eye” for this and it will be easier to see what needs to be done on a pattern.
Good luck and just let me know if you want me to clarify something!
