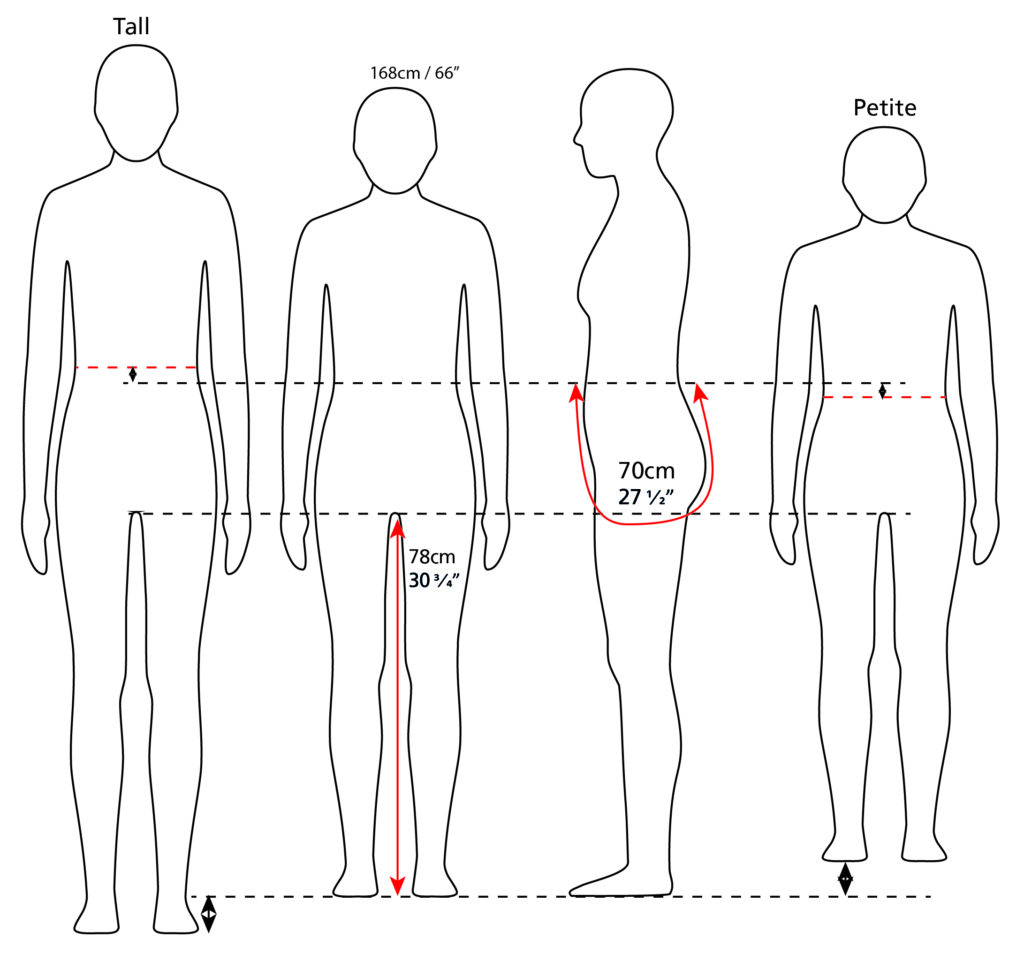
A common pattern adjustment is to lengthen or shorten a trouser. I have made a guide for how to lengthen / shorten your pattern and how much to adjust. My Fieldfare jogger’s pattern is made for a person who is about 168cm tall (66”), but the body proportions can of course vary even if you are that length. Therefore, it can also be good to measure the inner leg length and the total front and back rise and compare with the measurement list below.
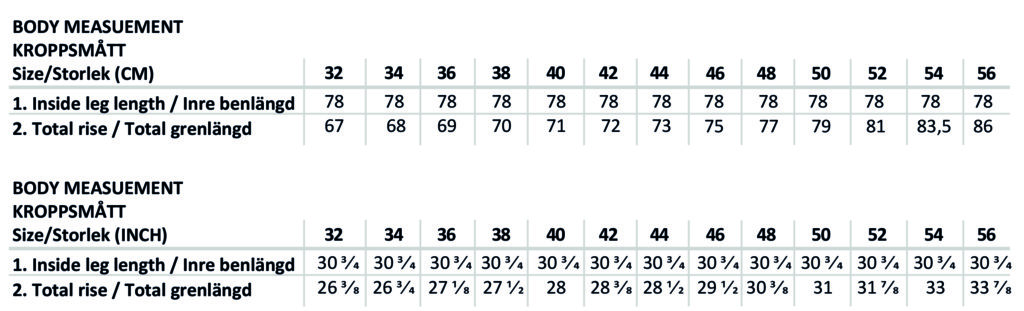
Inner leg length is measured from the crotch down to the floor. The easiest way to measure the total rise length is to tie an elastic around the waist at the narrowest point and measure the rise length from the front waist to the back. Then compare with the measurement list above and see if it is mainly the rise height or leg length that needs to be adjusted on the pattern.
How much do you need to adjust the pattern then? If you have 5cm (2”) shorter / longer inner leg length compared to the measurement chart, then you can shorten / extend the legs by 5cm (2”). If your total rise length is 3cm (1,2”) shorter / longer compared to the chart, then shorten / longer it with 3cm (1,2”) in total, that means 1.5cm (0,6”) on the front piece and 1.5cm (0,6”) on the back piece. However, the overall front and back rise length is a bit trickier to adjust since that length may depend on posture or even distribution of body width. But at least this can give an indication of how big the adjustment should be.
Then, of course, your preference and taste also matter. How high do you want the waist to be? How long do you want the legs? In the sewing description there is a measurement chart for the finished garment. If you have a favourite garment, you can compare those measurements with your garment and get an indication of what needs to be adjusted.
The simple and fast way: If it’s only a few cm you want to adjust the pattern, you can do it the easy way and just increase / decrease the seam allowance by 1cm (3/8”) at the leg or waist, depending on where you want to extend the pattern. But if you need to make a bigger adjustment, it is better to do it the “proper” way and distribute the length more evenly so that the width is also placed right.
On my pattern there are no lines drawn for where to extend / shorten the pattern, but you can use the notches to help. The notches on the leg shows the position of the knee and you can draw your line there. For the front and back rise, you can draw the line at the pocket opening notch.
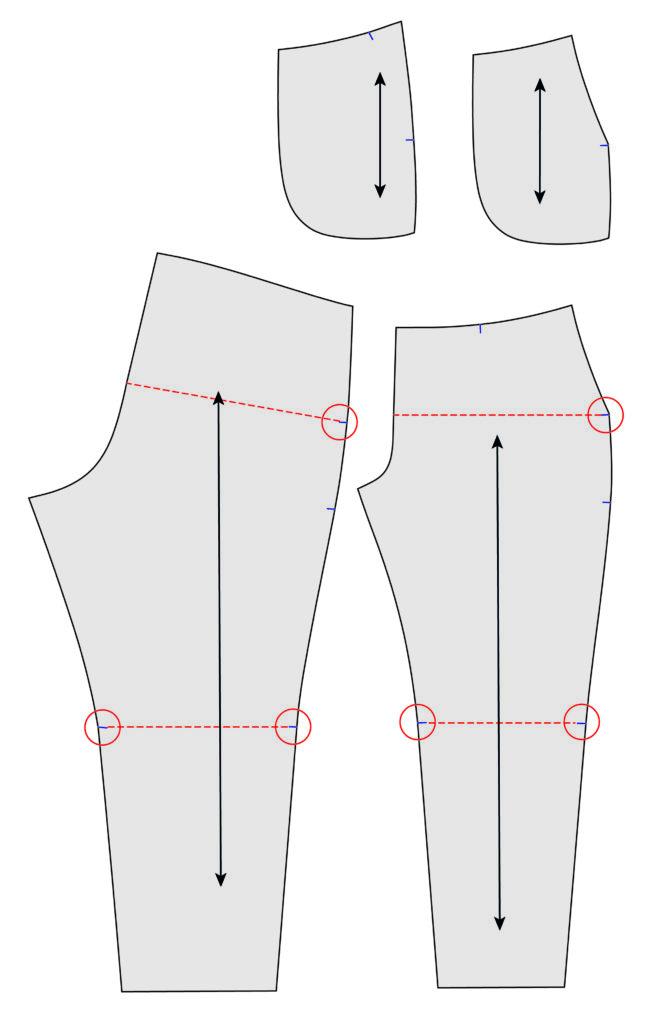
So why didn’t I draw these lines on the pattern? Well, mostly because there is no exact rule for where this line should be placed, and it also depends on what part you want to extend. If you want to extend the legs very much, it is also better to do it in more places to get the length more evenly distributed. And maybe you want to extend the upper leg more than the lower leg? It all depends on how your body looks. Below are examples of if you want to distribute the length in 3 different places, at the knee, the middle of the thigh and the middle of the calf.
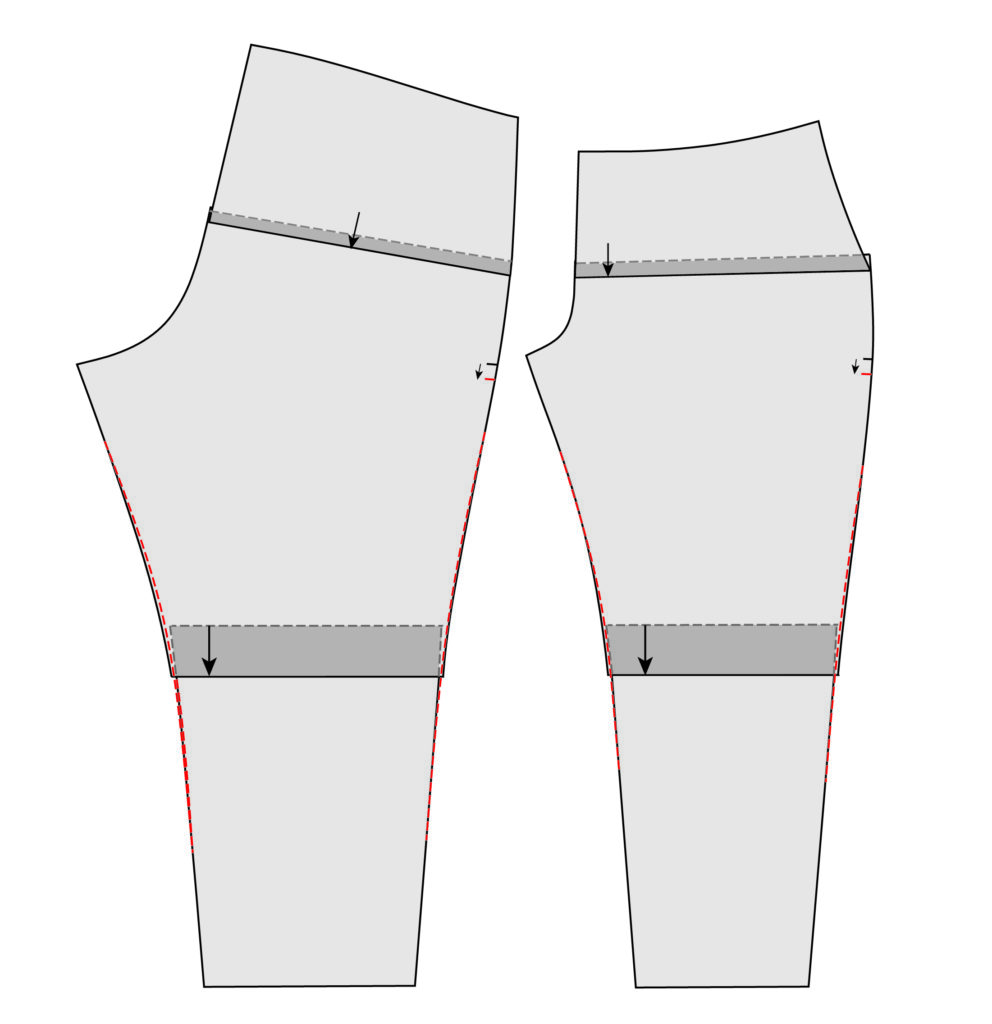
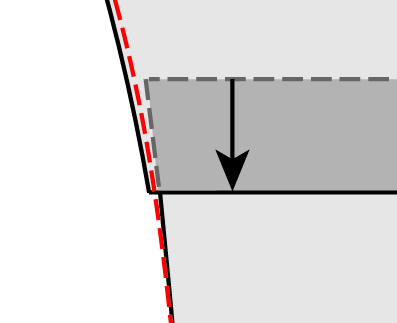
If you want to extend the front and back raise totally 3cm (1,2”) and the legs 5cm (2”), start by cutting the pattern on the dashed line at the knee and at the seat. Then move up the waist part 1.5cm (0,6”) on both the front and the back piece, be careful to move equally everywhere and remember to also move up the notches for the bottom position of the pocket. To extend the leg, increase the distance at the knee by 5cm (2“). You can have a pattern paper underneath your cutted pattern and then glue (or us scotch tape) the new placement on the pattern paper. Draw new and smoother side and front/back rise lines.
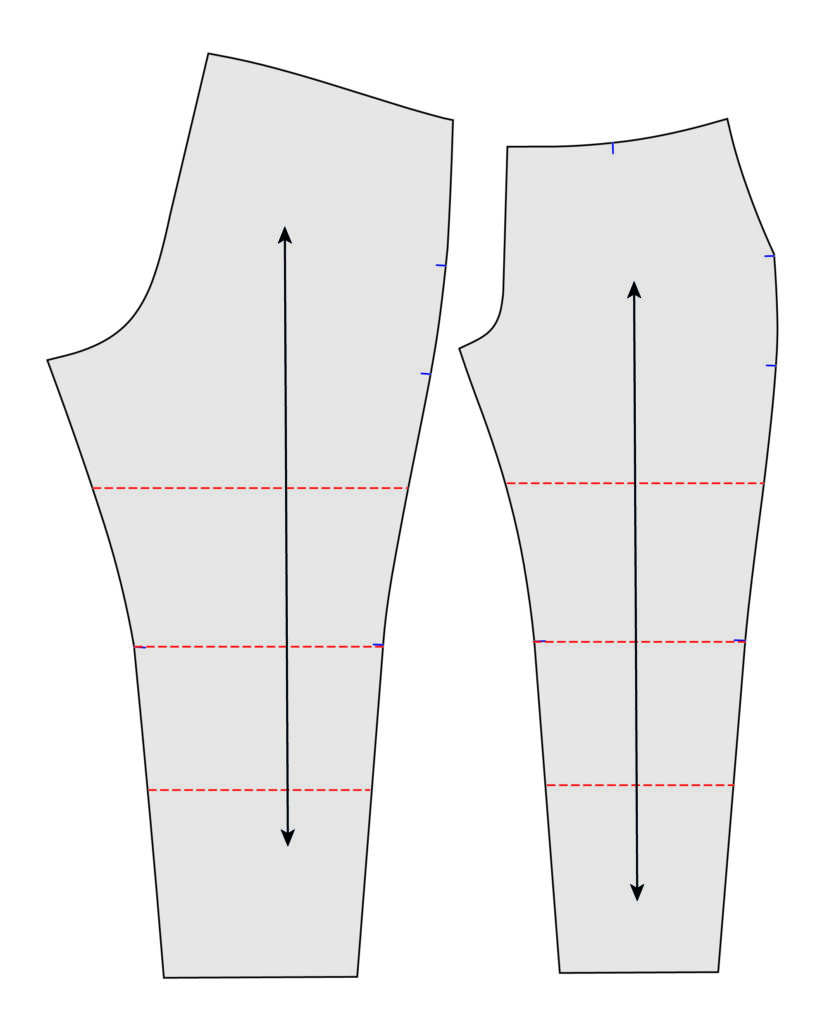
The same principle applies if you want to shorten the rise by a total of 3cm (1,2”) and the leg with 5cm (2”). You cut the dashed line at the knee and the seat and overlap the pattern pieces and tape or glue the new placement. Make sure that it becomes 1.5cm (0,6”) evenly over the seat and 5cm (2”) evenly at the knee. Remember to also move down the notches for the bottom position of the pocket.
Draw a new and smoother line at the side seam and front and back rise.
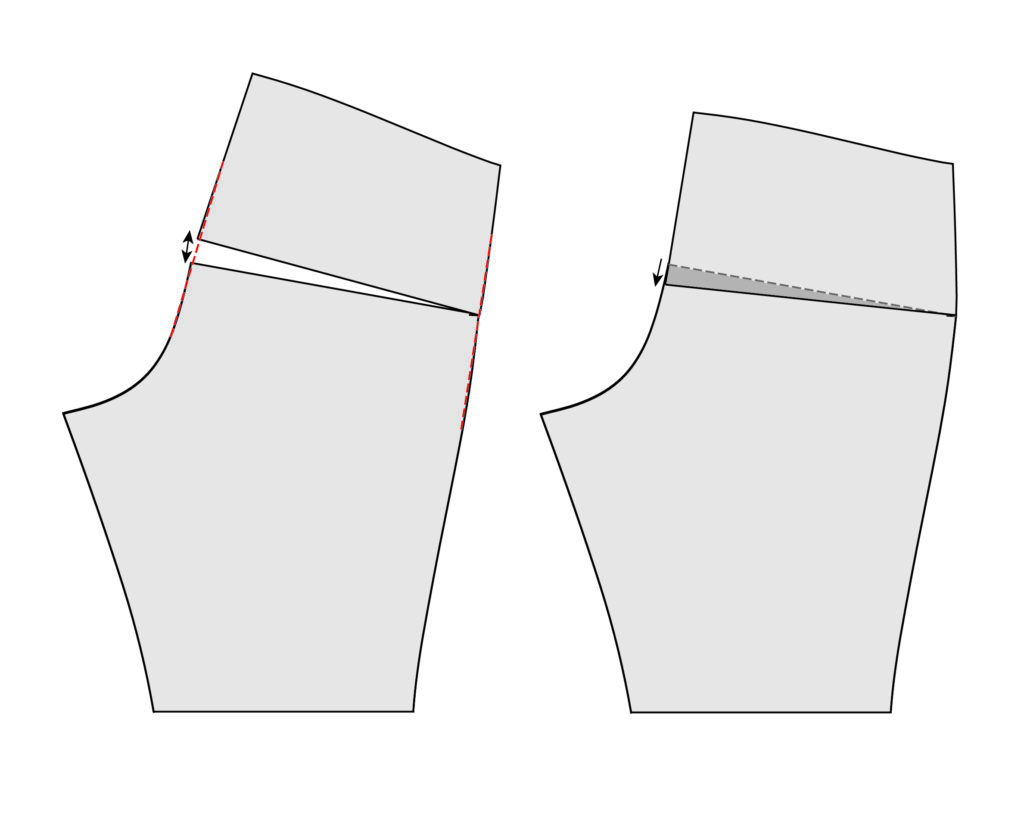
In the above example, the pattern parts are extended equally much. But sometimes you just want to extend or shorten the front / back rise. Then you can cut the pattern at the same dashed line at the seat and increase / decrease only at the front or back crotch. So, you don’t add or remove anything at the side. Draw new lines for the crotch and side seam to give it a nice shape.
This adjustment can be made both on the front and/or the back and may be needed if your posture makes your waistline not horizontal. In the example below, e.g. the total rise is still 70cm (27,5”) for a size 38, but the length of the front rise is longer than the back. Then you can increase the front crotch with 1-2cm (3/8-3/4”) and decrease the back crotch the same length. The side seam is still unchanged. This adjustment will also affect the shape of the pocket, so do the same adjustments on the pocket bags. The easiest way is to place the pocket pattern pieces on top of the adjusted front piece to see how much they need to be adjusted.
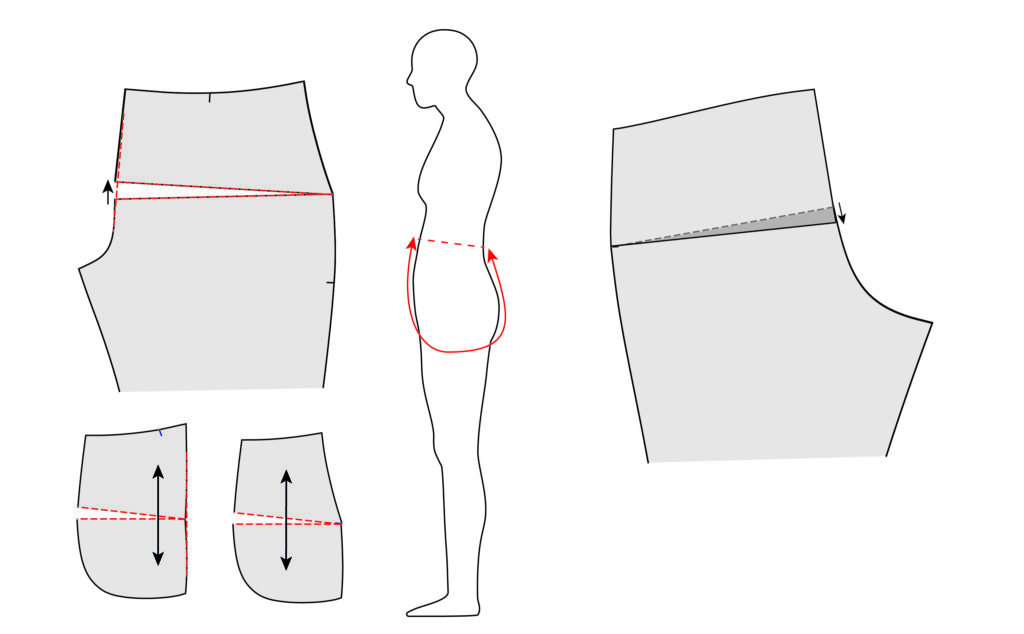
This adjustment can also be made if you have a bigger / smaller stomach or bottom. But I will go into that adjustment more carefully in a later post!
You can buy the Fieldfare Women’s joggers here at my Etsy shop!